Friday, November 04, 2005

Lens Baby and IR


Combining a Lens Baby and IR may be a great combo, I still have cloudy pouring weather here in Portland, So this is all I could come up with... from the cover of my porch.

Enjoy!

Thursday, November 03, 2005

Infrared Portrait with the D30


Here is an IR test from a recent Portrait session. The camera is working well, I used a hoya 72 filter hand held infront of the lens. Conversion to BW was done in Photoshop's channel mixer and a little bluring was added. Exposure was something like f11 at Iso 200 with studio strobes.

Enjoy!

Wednesday, November 02, 2005

http://www.lifepixel.com/IR.htm has a tutorial now for the D60. This is almost the same as the D30 except the D30 is easier... Their tutorial obviously had some care put into it, while mine was spewed out in several minutes. Between these two tutorials you shoudl be able to do it too.

If you order a hotmirror from them I would think it would work but I am not sure if the D60 is that much different than the D30. My method was to take two 1mm glass microscope slides, cut them to the smae dimentions as my removed D30 hotmirror and then glue them together with glass glue from a craft store. I spent $14 on slides and $3 on glue, and $5 on a glass cutter (which I allready had).

My best result was completely covering the glass with glue, droping the oter piece on top, then when dry after 30 seconds, and no bubbles were visible, I cleaned the glue off the frnt and back with my fingernail and a microfiber cloth.

Hey it
http://www.lifepixel.com/IR.htm has a tutorial now for the D60. This is almost the same as the D30 except the D30 is easier... Their tutorial obviously had some care put into it, while mine was spewed out in several minutes. Between these two tutorials you shoudl be able to do it too.

If you order a hotmirror from them I would think it would work but I am not sure if the D60 is that much different than the D30. My method was to take two 1mm glass microscope slides, cut them to the smae dimentions as my removed D30 hotmirror and then glue them together with glass glue from a craft store. I spent $14 on slides and $3 on glue, and $5 on a glass cutter (which I allready had).

My best result was completely covering the glass with glue, droping the oter piece on top, then when dry after 30 seconds, and no bubbles were visible, I cleaned the glue off the frnt and back with my fingernail and a microfiber cloth.

Hey it worked pretty well, why spend the big bucks on glass.

An actual image from the camera


Here are two of my first images with my "new" D30. I used a Hoya 72 filter which is pretty much opaque, but the autofocus on the camera still works. You can frame without the filter then hold it infront of the lens and take the image. I will try out other filters as well. I have a #25 red filter that makes a reasonable IR image, although it doesn't give skies those dramatic blacks like the Hoya 72.

step 6

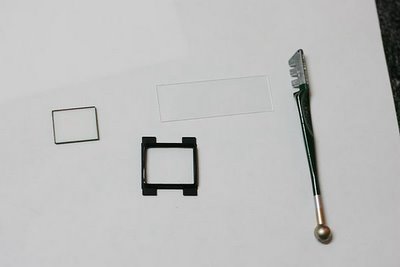
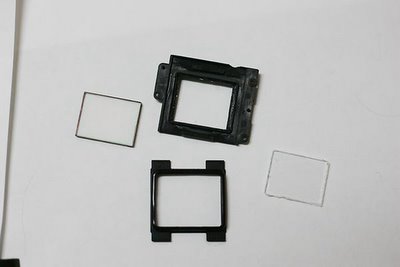
Fig 20 shows that I used a microscope slide and a glass cutter to make a replacement hot mirror. I glued two pieces of slide togethger with glass glue then glued it into the hot mirror holder. Now that I see that it all worked and it can be removed easily I may buy a nice piece of glass.

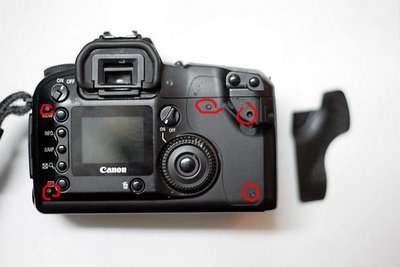
Reverse the directions to put it together. My best advice is to put lots of 2-3 inch tape loops, sticky side up on white paper. Put each set of different screws on a tape strip and then write below it where they go. There are lots of screws, and some look similar but are slightly different, so pay attention.

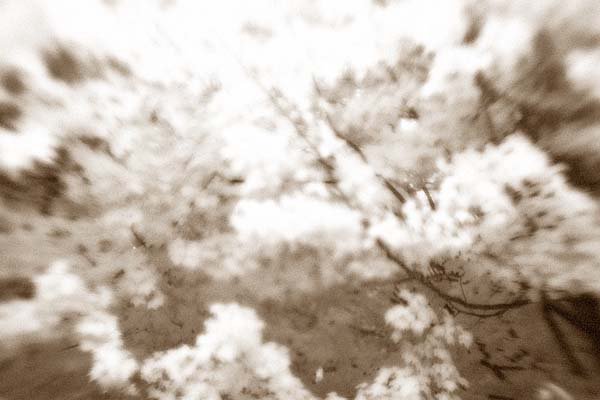
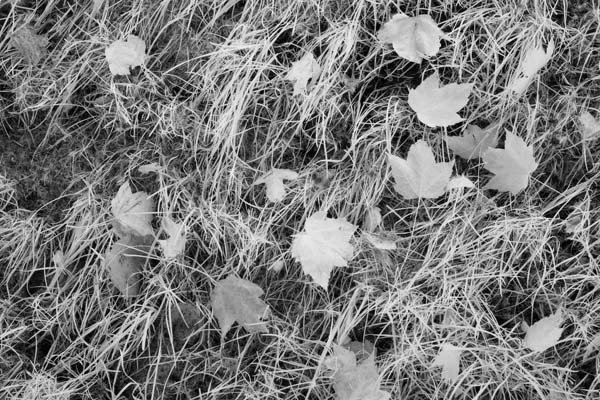
With this set up even a #25 red filter on the lens makes for a reasonable IR image. You may want to do a custom white balnce for a sunny scene off a white piece of paper, so the images look BW not red.


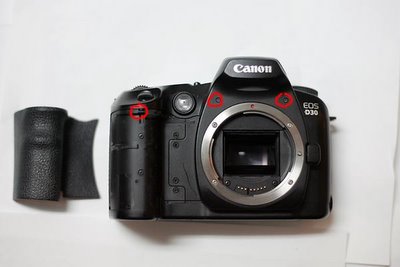
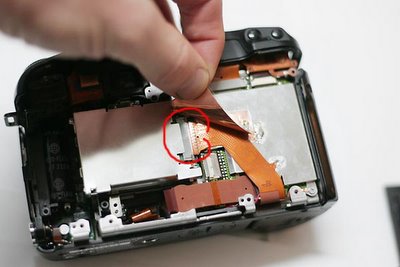
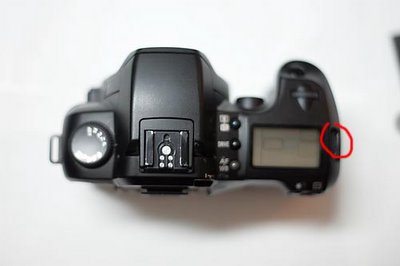
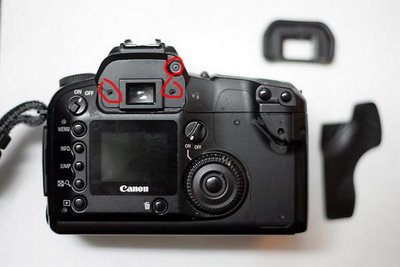
My biggest mistake came when I pushed in the row of three buttons on the top whch control the AF, WB etc... don't push any buttons , in fact, don't put your hand on the top of the camera when trying to push up the top section, push from below instead, these buttons take a long time to find, and get put back in.

step 5

Fig16 shows the LCD and Circuit board combo removed. 4 screws are involved.

Fig 17 shows the hidden connector that needs to be removed. You just bend the top orange connector back, but don't break the solder.

Fig 18 shows the sensor and hottmirror flipped over.. not disconnected. Three more scres removes the hot mirror and plastic holder. There is also a rubber gasket, a simple exacto knofe removes the hot mirror from the plastic. Fig 19.

step 4


Then Fig 11 shows the metal plate being removed.

Fig 12 shows three more ribbons to be removed. The bottom left brown bit has a tendency to drop into the camera... At least for me. I stopped paying attention, so I may have missed a screw here.

I also dound a spare part! don't know where fig 13 goes...

Fig 14 shows an "L" shaped circuit board being removed.

Fig 15 shows the dangerous capacitor for the flash.. Never touch this.. I did it once with a disposable camera and threw it accross the room after is zapped me, I am guessing this one might kill you. 15 also shows the screws to remove so the LCD screen can be removed.

step 3

Fig 9 shows the screw on top under the strap connector that needs to be removed.


Fig 10 shows a lot, and is the start of the hardest part. All the screws need to be removed from the metal plate, and two next to the eyepiece and the one holding the diopter dial to the right of the eyepiece.


THERE IS ONE SCREW THAT SHOULD NOT BE REMOVED DIRECTLY ABOVE THE EYEPIECE IT IS SHOWN CIRCLED IN BLUE>>> YOU HAVE BEEN WARNED< I DID IT AND I"M SORRY NOW.

You will notice that the upper right screw on the metal plate is hidden, and to get to it the whole top part of the camera needs to be bent up and forwards. This is the hard part, it takes some wiggling and jiggling and pushing and feels like you are going to break it. But eventually the top is pushed up enough to remove the screw.

Step 2

Figs 5 and 6 show the back removed and then the ribbon cable that has to be removed to seperate the back. There are several flat orange cables that have to be disconnected. There is always a brown piece of plastic that has to be flipped up with a finger nail or a small flat screwdriver. they go back in very easily. Some of the brown flips are different, but you should be able to figure it out.


Fig 7 and 8 show the screws that are under the side flap that covers the digital out connector, once this plastic is removed, you also need to remove the scres on the side holding the metal plate.

How to do it

Quick and messy D30 Ir Hack... Forgive me if I forget a screw or two. Don't force anything unless I indicate it, if it is stuck there is another screw...

Step 1 is to remove thwe battery... I removed mine a day before.. There are capacitors in there that can shock you good, and hold a charge for a long time.

Remove the screws from the back of the camera, lift off the eye piece to see two more. (fig 1.)

Remove the rubber grip from front and back of camera.. remove screw under trigger button, and the three on the back too... (fig 2 and 3 and 4) 
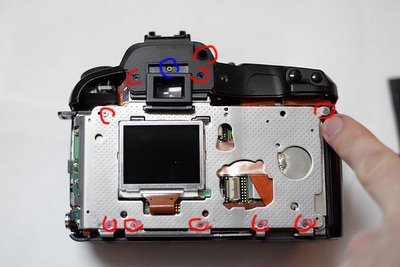
Also the two screws above the lens mount.